In an earlier post about identifying interfaces on the WD PR2100 motherboard, I mentioned that the UART debug port may be more useful than HDMI. Later I found an old WD Community thread that records how to access the internal UART console on the PR4100 / PR2100.
This kind of work is for people who are already comfortable with multimeters, USB-UART adapters, TTL levels, and basic hardware debugging. It is not a casual “repair your NAS” tutorial. A wrong wire, a short circuit, or the wrong voltage level can mean anything from no output to a damaged motherboard.
Original thread: USB to Serial UART Console Access for PR4100 / PR2100
Start With the Risks
The most important part is not how to connect it, but what you must not connect.
- Do not connect
VCC. - Do not use
5VTTL. - Do not connect traditional
RS-232levels directly. - Do not move clips or probes around while the board is powered.
- Do not plug in a USB-UART adapter before confirming the pinout.
The serial port on PR4100 / PR2100-class NAS motherboards is usually 3.3V TTL UART. In practice, you normally need only three wires:
|
|
VCC is not there for you to power the board. Connecting the USB-UART power pin to the NAS motherboard VCC may damage the motherboard.
What You Need
The basic tools are:
- a
3.3VUSB-UART adapter; - a multimeter that can measure voltage and resistance reliably;
- suitable 4-pin JST wiring or jumper wires;
- terminal software such as PuTTY, minicom, or screen;
- a steady hand and a conservative mindset.
If the USB-UART module has a 3.3V / 5V jumper, confirm that it is set to 3.3V. Many serial modules default to 5V, and that detail is easy to miss.
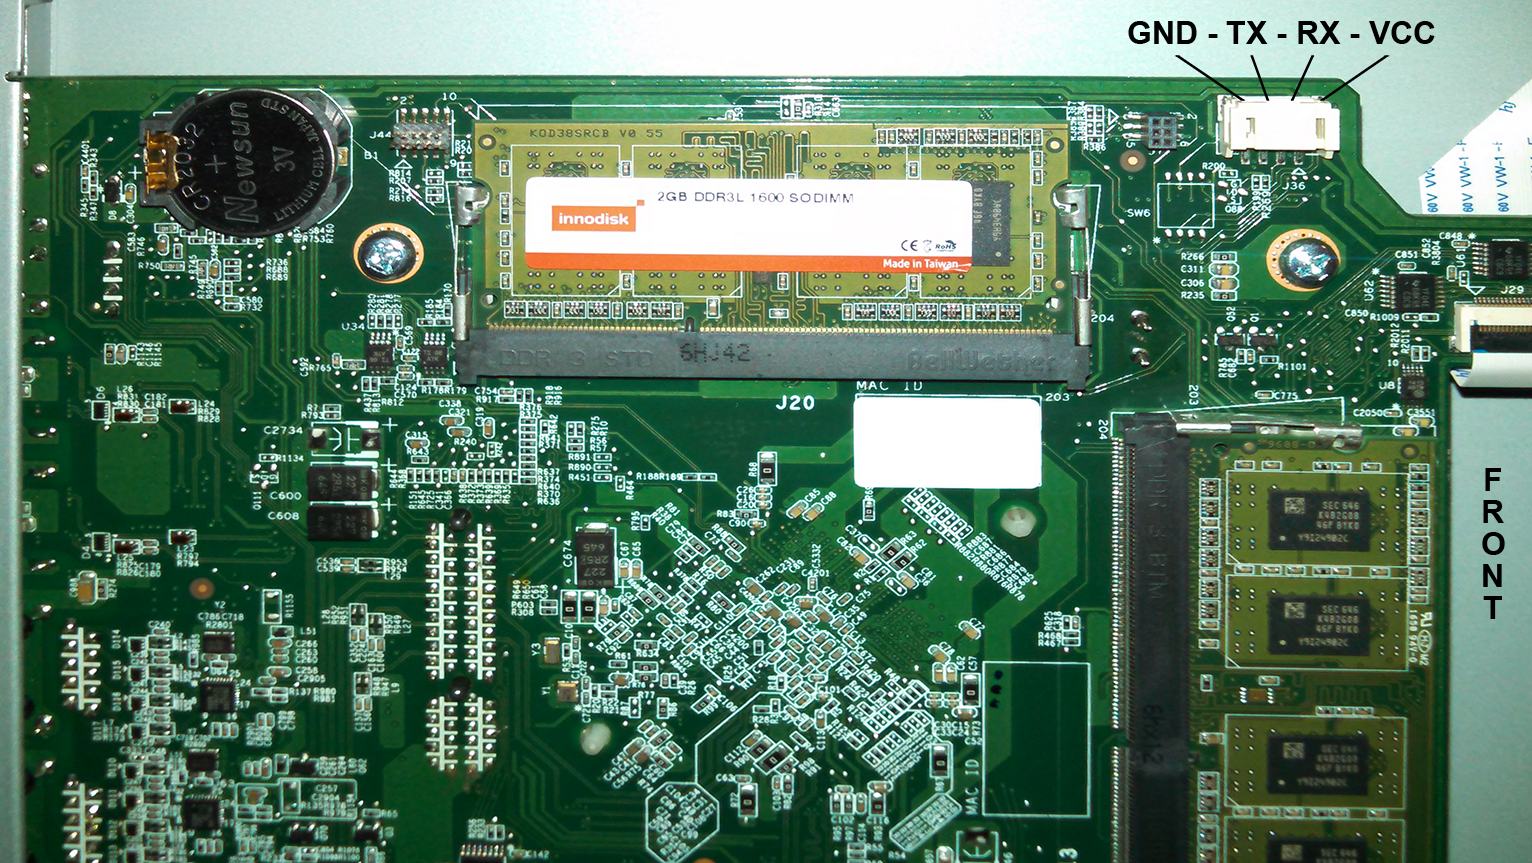
UART Location and Pins
The WD Community post is based on the PR4100, and later replies mention similar interfaces and settings on the PR2100 / DL4100. The PR4100 4-pin UART order given in the original post is:
|
|
But you should not trust that order blindly. Different revisions, models, and board layouts may differ. Before touching anything, verify it yourself with a multimeter.
A safer identification process is:
- Power off the NAS and unplug the power cable.
- Use resistance mode to find
GNDby measuring each pin against a known ground point, such as the metal frame or a shield. - During boot, use voltage mode to observe each pin.
TXmay show slight voltage activity while boot logs are being sent, then settle near3.3V.VCCis often a steady3.3V.RXis not always consistent. It may be pulled high, pulled low, or left floating.
A logic analyzer can also help identify TX / RX / VCC. But it only helps you see signals; it does not take responsibility for a wrong connection.
Correct Wiring
The TX / RX lines must be crossed between the USB-UART adapter and the NAS motherboard:
|
|
If you only want to view boot logs, you can start with a read-only connection:
|
|
This read-only wiring cannot send input, but it is lower risk and useful for the first check.
Serial Settings
The serial settings used in the original post are:
|
|
In the common shorthand:
|
|
On Windows, use Device Manager to find the COM port assigned to the USB-UART adapter, then choose Serial in PuTTY. On Linux / macOS, the device usually appears as something like /dev/ttyUSB0 or /dev/tty.usbserial-*.
What Success Looks Like
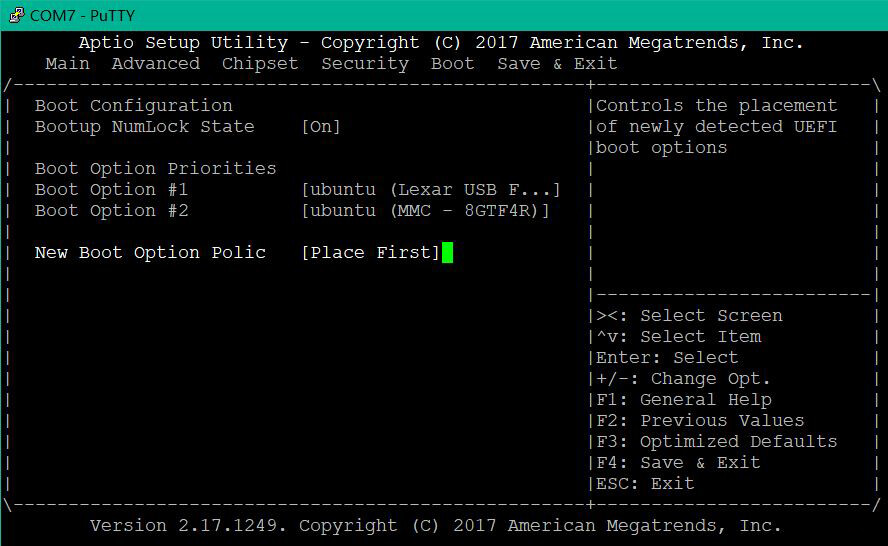
If the wiring and settings are correct, the terminal should show boot logs after the NAS powers on. You may eventually see BIOS / UEFI screens, Boot Loader output, or Linux boot messages.
Some WD Community replies report seeing Aptio Setup Utility through this method. Others used the serial console to diagnose systems that would not boot normally. For installing Debian, changing boot options, diagnosing failed firmware upgrades, blinking blue LEDs, or similar problems, the serial console is often more reliable than the web admin UI.
Still, seeing logs does not mean the machine can always be fixed. It only gives you a lower-level observation window.
Common Problems
PuTTY opens but shows nothing
First test the USB-UART adapter itself. Short its own TX and RX, type in the terminal, and check whether the characters echo back. If they do, the adapter and driver are probably working. Then check the COM port, baud rate, common ground, and whether the NAS TX is actually connected to USB-UART RX.
Still no logs after connecting
The pinout may be wrong, or the serial adapter may be using the wrong voltage level. Power down and confirm GND / TX / RX / VCC again. Do not keep trying just because “the forum said this order is correct.”
Logs appear, but input does not work
Check the NAS RX <--> USB-UART TX path. If you only connected GND and NAS TX, read-only output is expected.
The cable does not fit
The original thread discusses JST connector size and limited space around the pins. Do not force a connector in and risk shorting adjacent pins. It is better to use the right 4-pin JST cable than to gamble with loose clips.
How This Relates to the PR2100 Motherboard Analysis
In the earlier PR2100 article, my conclusion was that the suspected UART connector is worth verifying first because it may expose BIOS, Boot Menu, or a Linux console directly.
The WD Community thread adds a practical piece of evidence:
- the PR4100 does have a usable internal UART;
- the common setting is
115200 8N1; - the observed pin order is
GND, TX, RX, VCC; TX / RXmust be crossed;VCCmust be left unconnected;- PR2100 / DL4100 may also apply, but still need measurement.
So if the next step is installing Linux on a PR2100, recovering boot, diagnosing blinking blue LEDs, or entering BIOS, the serial console is more reliable than guessing HDMI behavior or blindly modifying the disk system.
Conclusion
The UART console on the PR4100 / PR2100 is not a complicated modification, but it is extremely sensitive to details.
A safer order is:
- Power off and open the case.
- Find the suspected 4-pin UART.
- Use a multimeter to confirm
GND. - Observe
TX / RX / VCCwhile powered. - Use a
3.3VUSB-UART adapter. - Connect only
GND / TX / RX. - Never connect
VCC. - Open the terminal with
115200 8N1. - Read logs first, then decide whether to send commands.
In hardware debugging, the expensive part is not the USB-UART adapter or the multimeter. It is the discontinued NAS motherboard that may still hold your data. Slowing down and checking one more time is usually cheaper than trying to recover a bricked board.